If you are a TA grading student assignments and want to avoid doing it manually, this guide is for you. I will show you how to:
- Use GitHub Classroom to post coding assignments.
- Autograde those assignments.
- Connect Canvas to GitHub Classroom to sync student info.
Phase 1: Account Setup
In order to create a GitHub Classroom, you will need a GitHub organization.
- Create a GitHub Org: Navigate to plan to create an organization.
- Create a Classroom: Go to classroom -> Click “New Classroom” -> Select your Org.

RemarkYou can ask your professor/supervisor to do this and assign you as the admin for both the organization and the classroom.
Phase 2: Making an Assignment
This part can be confusing for beginners. Let me walk you through the steps first, and I will explain the underlying details below.
- Create a Template Repo: Create a standard repository (e.g.,
hw-starter) in your organization.- (optional) Upload
src/,tests/,CMakeLists.txt, and.github/workflows/classroom.ymlfor a C++ assignment.
- (optional) Upload
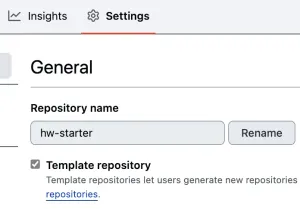
- Mark as Template (CRITICAL):
- Go to your repository Settings -> General.
- Check the box ☑️ Template repository.
-
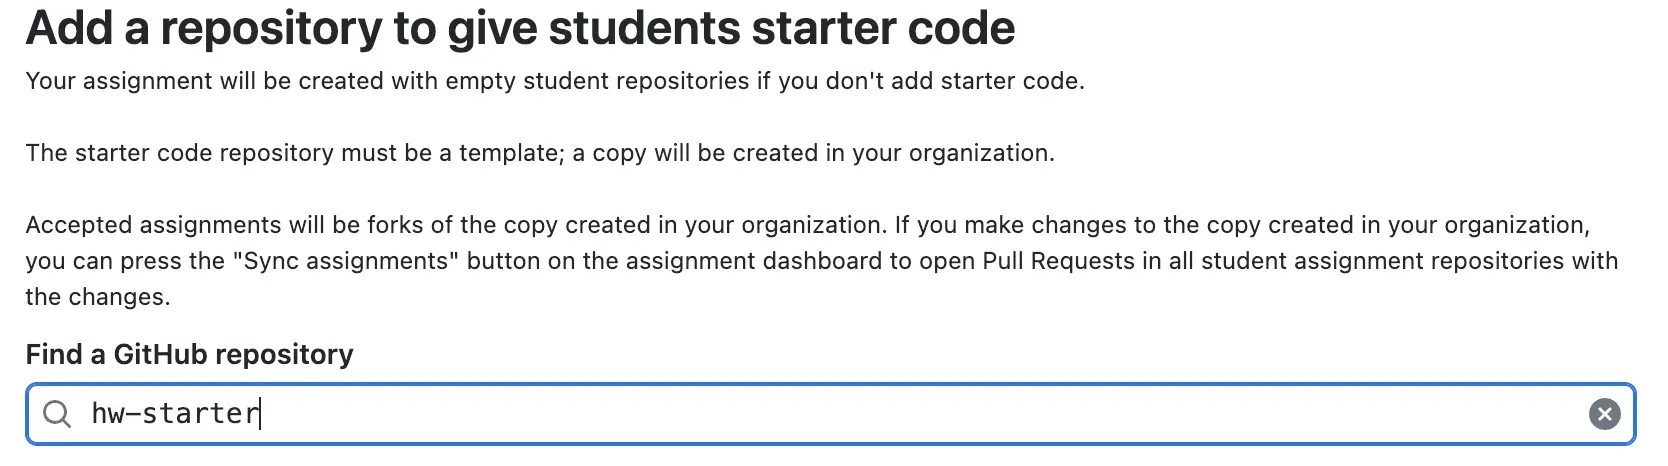
- Create the Assignment:
- Go to your Classroom Dashboard -> New Assignment.
- Title:
hw1-cpp-basics(Keep it short). - Repo Visibility: Private.
- Starter Code: Select
hw-starter. - Autograding: Skip this step in the UI (your
.github/workflowsfile will handle this automatically). - Feedback PRs: Enable this so you can leave comments on student code.
- Get the Link: Copy the “Invite Link” generated at the end and share it with your students.
How many repo will be created?
The naming scheme is very confusing when you first use GitHub Classroom. I want to be as clear as possible here 😬.
There are exactly 3 repositories involved:
{template repo}{your classroom name}-{assignment title}-{template repo name}{assignment title}-{github user name}
Suppose you use the following values:
- Template repo name:
hw-starter - Classroom name:
isdn3000e - Assignment title:
hw1-cpp-basics - Student’s GitHub username:
XingxinHE
Then the 3 repos will be:
hw-starterisdn3000e-hw1-cpp-basics-hw-starterhw1-cpp-basics-XingxinHE
Why should I care about these nuances?The key reason is that you need to know which repository to modify if you find a bug in the starter code. If you update the wrong one, the students won’t get the fixes! I’ll explain this in the next section.
What are the relationships among these 3 repos?
Ideally, we just want to create the assignment repo. However, the Github classroom requires that an assignment is built from a template repo. That’s why we must create hw-starter first.
%3b%7d%23mermaid-0 .cluster rect%7bfill:white%3bstroke:hsl(0%2c 0%25%2c 90%25)%3bstroke-width:1px%3b%7d%23mermaid-0 .cluster text%7bfill:black%3b%7d%23mermaid-0 .cluster span%7bcolor:black%3b%7d%23mermaid-0 div.mermaidTooltip%7bposition:absolute%3btext-align:center%3bmax-width:200px%3bpadding:2px%3bfont-family:arial%2csans-serif%3bfont-size:12px%3bbackground:white%3bborder:1px solid hsl(0%2c 0%25%2c 90%25)%3bborder-radius:2px%3bpointer-events:none%3bz-index:100%3b%7d%23mermaid-0 .flowchartTitleText%7btext-anchor:middle%3bfont-size:18px%3bfill:%23171717%3b%7d%23mermaid-0 rect.text%7bfill:none%3bstroke-width:0%3b%7d%23mermaid-0 .icon-shape%2c%23mermaid-0 .image-shape%7bbackground-color:%23f5f5f5%3btext-align:center%3b%7d%23mermaid-0 .icon-shape p%2c%23mermaid-0 .image-shape p%7bbackground-color:%23f5f5f5%3bpadding:2px%3b%7d%23mermaid-0 .icon-shape rect%2c%23mermaid-0 .image-shape rect%7bopacity:0.5%3bbackground-color:%23f5f5f5%3bfill:%23f5f5f5%3b%7d%23mermaid-0 :root%7b--mermaid-font-family:arial%2csans-serif%3b%7d%3c/style%3e%3cg%3e%3cmarker orient='auto' markerHeight='8' markerWidth='8' markerUnits='userSpaceOnUse' refY='5' refX='5' viewBox='0 0 10 10' class='marker flowchart-v2' id='mermaid-0_flowchart-v2-pointEnd'%3e%3cpath style='stroke-width: 1%3b stroke-dasharray: 1%2c 0%3b' class='arrowMarkerPath' d='M 0 0 L 10 5 L 0 10 z'/%3e%3c/marker%3e%3cmarker orient='auto' markerHeight='8' markerWidth='8' markerUnits='userSpaceOnUse' refY='5' refX='4.5' viewBox='0 0 10 10' class='marker flowchart-v2' id='mermaid-0_flowchart-v2-pointStart'%3e%3cpath style='stroke-width: 1%3b stroke-dasharray: 1%2c 0%3b' class='arrowMarkerPath' d='M 0 5 L 10 10 L 10 0 z'/%3e%3c/marker%3e%3cmarker orient='auto' markerHeight='11' markerWidth='11' markerUnits='userSpaceOnUse' refY='5' refX='11' viewBox='0 0 10 10' class='marker flowchart-v2' id='mermaid-0_flowchart-v2-circleEnd'%3e%3ccircle style='stroke-width: 1%3b stroke-dasharray: 1%2c 0%3b' class='arrowMarkerPath' r='5' cy='5' cx='5'/%3e%3c/marker%3e%3cmarker orient='auto' markerHeight='11' markerWidth='11' markerUnits='userSpaceOnUse' refY='5' refX='-1' viewBox='0 0 10 10' class='marker flowchart-v2' id='mermaid-0_flowchart-v2-circleStart'%3e%3ccircle style='stroke-width: 1%3b stroke-dasharray: 1%2c 0%3b' class='arrowMarkerPath' r='5' cy='5' cx='5'/%3e%3c/marker%3e%3cmarker orient='auto' markerHeight='11' markerWidth='11' markerUnits='userSpaceOnUse' refY='5.2' refX='12' viewBox='0 0 11 11' class='marker cross flowchart-v2' id='mermaid-0_flowchart-v2-crossEnd'%3e%3cpath style='stroke-width: 2%3b stroke-dasharray: 1%2c 0%3b' class='arrowMarkerPath' d='M 1%2c1 l 9%2c9 M 10%2c1 l -9%2c9'/%3e%3c/marker%3e%3cmarker orient='auto' markerHeight='11' markerWidth='11' markerUnits='userSpaceOnUse' refY='5.2' refX='-1' viewBox='0 0 11 11' class='marker cross flowchart-v2' id='mermaid-0_flowchart-v2-crossStart'%3e%3cpath style='stroke-width: 2%3b stroke-dasharray: 1%2c 0%3b' class='arrowMarkerPath' d='M 1%2c1 l 9%2c9 M 10%2c1 l -9%2c9'/%3e%3c/marker%3e%3cg class='root'%3e%3cg class='clusters'/%3e%3cg class='edgePaths'%3e%3cpath marker-end='url(%23mermaid-0_flowchart-v2-pointEnd)' style='' class='edge-thickness-normal edge-pattern-solid edge-thickness-normal edge-pattern-solid flowchart-link' id='L_A_B_0' d='M165.844%2c59L180.902%2c59C195.961%2c59%2c226.078%2c59%2c255.529%2c59C284.979%2c59%2c313.763%2c59%2c328.155%2c59L342.547%2c59'/%3e%3cpath marker-end='url(%23mermaid-0_flowchart-v2-pointEnd)' style='' class='edge-thickness-normal edge-pattern-solid edge-thickness-normal edge-pattern-solid flowchart-link' id='L_B_C_1' d='M606.547%2c59L620.053%2c59C633.56%2c59%2c660.573%2c59%2c686.919%2c59C713.266%2c59%2c738.945%2c59%2c751.785%2c59L764.625%2c59'/%3e%3c/g%3e%3cg class='edgeLabels'%3e%3cg transform='translate(256.1953125%2c 59)' class='edgeLabel'%3e%3cg transform='translate(-65.3515625%2c -24)' class='label'%3e%3cforeignObject height='48' width='130.703125'%3e%3cdiv style='display: table-cell%3b white-space: nowrap%3b line-height: 1.5%3b max-width: 200px%3b text-align: center%3b' class='labelBkg' xmlns='http://www.w3.org/1999/xhtml'%3e%3cspan class='edgeLabel'%3e%3cp%3eGitHub Classroom%3cbr /%3euses as template%3c/p%3e%3c/span%3e%3c/div%3e%3c/foreignObject%3e%3c/g%3e%3c/g%3e%3cg transform='translate(687.5859375%2c 59)' class='edgeLabel'%3e%3cg transform='translate(-56.0390625%2c -24)' class='label'%3e%3cforeignObject height='48' width='112.078125'%3e%3cdiv style='display: table-cell%3b white-space: nowrap%3b line-height: 1.5%3b max-width: 200px%3b text-align: center%3b' class='labelBkg' xmlns='http://www.w3.org/1999/xhtml'%3e%3cspan class='edgeLabel'%3e%3cp%3estudent accepts%3cbr /%3eassignment%3c/p%3e%3c/span%3e%3c/div%3e%3c/foreignObject%3e%3c/g%3e%3c/g%3e%3c/g%3e%3cg class='nodes'%3e%3cg transform='translate(86.921875%2c 59)' id='flowchart-A-0' class='node default'%3e%3crect height='78' width='157.84375' y='-39' x='-78.921875' style='fill:%23fafafa !important%3bstroke:%23171717 !important%3bstroke-width:1px !important' class='basic label-container'/%3e%3cg transform='translate(-48.921875%2c -24)' style='color:%23171717 !important' class='label'%3e%3crect/%3e%3cforeignObject height='48' width='97.84375'%3e%3cdiv xmlns='http://www.w3.org/1999/xhtml' style='color: rgb(23%2c 23%2c 23) !important%3b display: table-cell%3b white-space: nowrap%3b line-height: 1.5%3b max-width: 200px%3b text-align: center%3b'%3e%3cspan class='nodeLabel' style='color:%23171717 !important'%3e%3cp%3ehw-starter%3cbr /%3e%3ci%3etemplate repo%3c/i%3e%3c/p%3e%3c/span%3e%3c/div%3e%3c/foreignObject%3e%3c/g%3e%3c/g%3e%3cg transform='translate(476.546875%2c 59)' id='flowchart-B-1' class='node default'%3e%3crect height='102' width='260' y='-51' x='-130' style='fill:%23fafafa !important%3bstroke:%23171717 !important%3bstroke-width:1px !important' class='basic label-container'/%3e%3cg transform='translate(-100%2c -36)' style='color:%23171717 !important' class='label'%3e%3crect/%3e%3cforeignObject height='72' width='200'%3e%3cdiv xmlns='http://www.w3.org/1999/xhtml' style='color: rgb(23%2c 23%2c 23) !important%3b display: table%3b white-space: break-spaces%3b line-height: 1.5%3b max-width: 200px%3b text-align: center%3b width: 200px%3b'%3e%3cspan class='nodeLabel' style='color:%23171717 !important'%3e%3cp%3eisdn3000e-hw1-cpp-basics-hw-starter%3cbr /%3e%3ci%3eassignment repo%3c/i%3e%3c/p%3e%3c/span%3e%3c/div%3e%3c/foreignObject%3e%3c/g%3e%3c/g%3e%3cg transform='translate(894.21875%2c 59)' id='flowchart-C-3' class='node default'%3e%3crect height='78' width='251.1875' y='-39' x='-125.59375' style='fill:%23fafafa !important%3bstroke:%23171717 !important%3bstroke-width:1px !important' class='basic label-container'/%3e%3cg transform='translate(-95.59375%2c -24)' style='color:%23171717 !important' class='label'%3e%3crect/%3e%3cforeignObject height='48' width='191.1875'%3e%3cdiv xmlns='http://www.w3.org/1999/xhtml' style='color: rgb(23%2c 23%2c 23) !important%3b display: table-cell%3b white-space: nowrap%3b line-height: 1.5%3b max-width: 200px%3b text-align: center%3b'%3e%3cspan class='nodeLabel' style='color:%23171717 !important'%3e%3cp%3ehw1-cpp-basics-XingxinHE%3cbr /%3e%3ci%3estudent repo%3c/i%3e%3c/p%3e%3c/span%3e%3c/div%3e%3c/foreignObject%3e%3c/g%3e%3c/g%3e%3c/g%3e%3c/g%3e%3c/g%3e%3c/svg%3e)
Once you create the assignment in the dashboard, the assignment repo (isdn3000e-hw1-cpp-basics-hw-starter) is automatically created by the GitHub bot. It squashes all the commit history from hw-starter and initializes this new repo.
For example, if hw-starter has 6 commits, they will be combined(squashed) into a single initial commit in the assignment repo.
%3b%7d%23mermaid-0 .cluster rect%7bfill:white%3bstroke:hsl(0%2c 0%25%2c 90%25)%3bstroke-width:1px%3b%7d%23mermaid-0 .cluster text%7bfill:black%3b%7d%23mermaid-0 .cluster span%7bcolor:black%3b%7d%23mermaid-0 div.mermaidTooltip%7bposition:absolute%3btext-align:center%3bmax-width:200px%3bpadding:2px%3bfont-family:arial%2csans-serif%3bfont-size:12px%3bbackground:white%3bborder:1px solid hsl(0%2c 0%25%2c 90%25)%3bborder-radius:2px%3bpointer-events:none%3bz-index:100%3b%7d%23mermaid-0 .flowchartTitleText%7btext-anchor:middle%3bfont-size:18px%3bfill:%23171717%3b%7d%23mermaid-0 rect.text%7bfill:none%3bstroke-width:0%3b%7d%23mermaid-0 .icon-shape%2c%23mermaid-0 .image-shape%7bbackground-color:%23f5f5f5%3btext-align:center%3b%7d%23mermaid-0 .icon-shape p%2c%23mermaid-0 .image-shape p%7bbackground-color:%23f5f5f5%3bpadding:2px%3b%7d%23mermaid-0 .icon-shape rect%2c%23mermaid-0 .image-shape rect%7bopacity:0.5%3bbackground-color:%23f5f5f5%3bfill:%23f5f5f5%3b%7d%23mermaid-0 :root%7b--mermaid-font-family:arial%2csans-serif%3b%7d%3c/style%3e%3cg%3e%3cmarker orient='auto' markerHeight='8' markerWidth='8' markerUnits='userSpaceOnUse' refY='5' refX='5' viewBox='0 0 10 10' class='marker flowchart-v2' id='mermaid-0_flowchart-v2-pointEnd'%3e%3cpath style='stroke-width: 1%3b stroke-dasharray: 1%2c 0%3b' class='arrowMarkerPath' d='M 0 0 L 10 5 L 0 10 z'/%3e%3c/marker%3e%3cmarker orient='auto' markerHeight='8' markerWidth='8' markerUnits='userSpaceOnUse' refY='5' refX='4.5' viewBox='0 0 10 10' class='marker flowchart-v2' id='mermaid-0_flowchart-v2-pointStart'%3e%3cpath style='stroke-width: 1%3b stroke-dasharray: 1%2c 0%3b' class='arrowMarkerPath' d='M 0 5 L 10 10 L 10 0 z'/%3e%3c/marker%3e%3cmarker orient='auto' markerHeight='11' markerWidth='11' markerUnits='userSpaceOnUse' refY='5' refX='11' viewBox='0 0 10 10' class='marker flowchart-v2' id='mermaid-0_flowchart-v2-circleEnd'%3e%3ccircle style='stroke-width: 1%3b stroke-dasharray: 1%2c 0%3b' class='arrowMarkerPath' r='5' cy='5' cx='5'/%3e%3c/marker%3e%3cmarker orient='auto' markerHeight='11' markerWidth='11' markerUnits='userSpaceOnUse' refY='5' refX='-1' viewBox='0 0 10 10' class='marker flowchart-v2' id='mermaid-0_flowchart-v2-circleStart'%3e%3ccircle style='stroke-width: 1%3b stroke-dasharray: 1%2c 0%3b' class='arrowMarkerPath' r='5' cy='5' cx='5'/%3e%3c/marker%3e%3cmarker orient='auto' markerHeight='11' markerWidth='11' markerUnits='userSpaceOnUse' refY='5.2' refX='12' viewBox='0 0 11 11' class='marker cross flowchart-v2' id='mermaid-0_flowchart-v2-crossEnd'%3e%3cpath style='stroke-width: 2%3b stroke-dasharray: 1%2c 0%3b' class='arrowMarkerPath' d='M 1%2c1 l 9%2c9 M 10%2c1 l -9%2c9'/%3e%3c/marker%3e%3cmarker orient='auto' markerHeight='11' markerWidth='11' markerUnits='userSpaceOnUse' refY='5.2' refX='-1' viewBox='0 0 11 11' class='marker cross flowchart-v2' id='mermaid-0_flowchart-v2-crossStart'%3e%3cpath style='stroke-width: 2%3b stroke-dasharray: 1%2c 0%3b' class='arrowMarkerPath' d='M 1%2c1 l 9%2c9 M 10%2c1 l -9%2c9'/%3e%3c/marker%3e%3cg class='root'%3e%3cg class='clusters'/%3e%3cg class='edgePaths'%3e%3cpath marker-end='url(%23mermaid-0_flowchart-v2-pointEnd)' style='' class='edge-thickness-normal edge-pattern-solid edge-thickness-normal edge-pattern-solid flowchart-link' id='L_Starter_Squash_3' d='M202.906%2c266L207.073%2c266C211.24%2c266%2c219.573%2c266%2c227.24%2c266C234.906%2c266%2c241.906%2c266%2c245.406%2c266L248.906%2c266'/%3e%3cpath marker-end='url(%23mermaid-0_flowchart-v2-pointEnd)' style='' class='edge-thickness-normal edge-pattern-solid edge-thickness-normal edge-pattern-solid flowchart-link' id='L_Squash_Assignment_4' d='M431.906%2c266L436.073%2c266C440.24%2c266%2c448.573%2c266%2c456.24%2c266C463.906%2c266%2c470.906%2c266%2c474.406%2c266L477.906%2c266'/%3e%3c/g%3e%3cg class='edgeLabels'%3e%3cg class='edgeLabel'%3e%3cg transform='translate(0%2c 0)' class='label'%3e%3cforeignObject height='0' width='0'%3e%3cdiv style='display: table-cell%3b white-space: nowrap%3b line-height: 1.5%3b max-width: 200px%3b text-align: center%3b' class='labelBkg' xmlns='http://www.w3.org/1999/xhtml'%3e%3cspan class='edgeLabel'%3e%3c/span%3e%3c/div%3e%3c/foreignObject%3e%3c/g%3e%3c/g%3e%3cg class='edgeLabel'%3e%3cg transform='translate(0%2c 0)' class='label'%3e%3cforeignObject height='0' width='0'%3e%3cdiv style='display: table-cell%3b white-space: nowrap%3b line-height: 1.5%3b max-width: 200px%3b text-align: center%3b' class='labelBkg' xmlns='http://www.w3.org/1999/xhtml'%3e%3cspan class='edgeLabel'%3e%3c/span%3e%3c/div%3e%3c/foreignObject%3e%3c/g%3e%3c/g%3e%3c/g%3e%3cg class='nodes'%3e%3cg transform='translate(473.90625%2c 181.5)' class='root'%3e%3cg class='clusters'%3e%3cg data-look='classic' id='Assignment' class='cluster'%3e%3crect height='153' width='301.640625' y='8' x='8' style='fill:%23fafafa !important%3bstroke:%23171717 !important%3bstroke-width:1px !important'/%3e%3cg transform='translate(58.8203125%2c 8)' class='cluster-label'%3e%3cforeignObject height='48' width='200'%3e%3cdiv style='display: table%3b white-space: break-spaces%3b line-height: 1.5%3b max-width: 200px%3b text-align: center%3b width: 200px%3b' xmlns='http://www.w3.org/1999/xhtml'%3e%3cspan style='color:%23171717 !important' class='nodeLabel'%3e%3cp%3eisdn3000e-hw1-cpp-basics-hw-starter (assignment)%3c/p%3e%3c/span%3e%3c/div%3e%3c/foreignObject%3e%3c/g%3e%3c/g%3e%3c/g%3e%3cg class='edgePaths'/%3e%3cg class='edgeLabels'/%3e%3cg class='nodes'%3e%3cg transform='translate(158.8203125%2c 84.5)' id='flowchart-SC-5' class='node default'%3e%3crect height='78' width='231.640625' y='-39' x='-115.8203125' style='fill:white !important%3bstroke:%23171717 !important%3bstroke-width:2px !important' class='basic label-container'/%3e%3cg transform='translate(-85.8203125%2c -24)' style='color:%23171717 !important' class='label'%3e%3crect/%3e%3cforeignObject height='48' width='171.640625'%3e%3cdiv xmlns='http://www.w3.org/1999/xhtml' style='color: rgb(23%2c 23%2c 23) !important%3b display: table-cell%3b white-space: nowrap%3b line-height: 1.5%3b max-width: 200px%3b text-align: center%3b'%3e%3cspan class='nodeLabel' style='color:%23171717 !important'%3e%3cp%3esingle squashed commit%3cbr /%3e%3ci%3einitial commit%3c/i%3e%3c/p%3e%3c/span%3e%3c/div%3e%3c/foreignObject%3e%3c/g%3e%3c/g%3e%3c/g%3e%3c/g%3e%3cg transform='translate(0%2c 0)' class='root'%3e%3cg class='clusters'%3e%3cg data-look='classic' id='Starter' class='cluster'%3e%3crect height='516' width='194.90625' y='8' x='8' style='fill:%23fafafa !important%3bstroke:%23171717 !important%3bstroke-width:1px !important'/%3e%3cg transform='translate(31.65625%2c 8)' class='cluster-label'%3e%3cforeignObject height='24' width='147.59375'%3e%3cdiv style='display: table-cell%3b white-space: nowrap%3b line-height: 1.5%3b max-width: 200px%3b text-align: center%3b' xmlns='http://www.w3.org/1999/xhtml'%3e%3cspan style='color:%23171717 !important' class='nodeLabel'%3e%3cp%3ehw-starter (template)%3c/p%3e%3c/span%3e%3c/div%3e%3c/foreignObject%3e%3c/g%3e%3c/g%3e%3c/g%3e%3cg class='edgePaths'%3e%3cpath marker-end='url(%23mermaid-0_flowchart-v2-pointEnd)' style='' class='edge-thickness-normal edge-pattern-solid edge-thickness-normal edge-pattern-solid flowchart-link' id='L_C1_C2_0' d='M105.453%2c99.5L105.453%2c105.75C105.453%2c112%2c105.453%2c124.5%2c105.453%2c136.333C105.453%2c148.167%2c105.453%2c159.333%2c105.453%2c164.917L105.453%2c170.5'/%3e%3cpath marker-end='url(%23mermaid-0_flowchart-v2-pointEnd)' style='' class='edge-thickness-normal edge-pattern-solid edge-thickness-normal edge-pattern-solid flowchart-link' id='L_C2_C3_1' d='M105.453%2c228.5L105.453%2c234.75C105.453%2c241%2c105.453%2c253.5%2c105.453%2c265.333C105.453%2c277.167%2c105.453%2c288.333%2c105.453%2c293.917L105.453%2c299.5'/%3e%3cpath marker-end='url(%23mermaid-0_flowchart-v2-pointEnd)' style='' class='edge-thickness-normal edge-pattern-solid edge-thickness-normal edge-pattern-solid flowchart-link' id='L_C3_C6_2' d='M105.453%2c357.5L105.453%2c363.75C105.453%2c370%2c105.453%2c382.5%2c105.453%2c394.333C105.453%2c406.167%2c105.453%2c417.333%2c105.453%2c422.917L105.453%2c428.5'/%3e%3c/g%3e%3cg class='edgeLabels'%3e%3cg class='edgeLabel'%3e%3cg transform='translate(0%2c 0)' class='label'%3e%3cforeignObject height='0' width='0'%3e%3cdiv style='display: table-cell%3b white-space: nowrap%3b line-height: 1.5%3b max-width: 200px%3b text-align: center%3b' class='labelBkg' xmlns='http://www.w3.org/1999/xhtml'%3e%3cspan class='edgeLabel'%3e%3c/span%3e%3c/div%3e%3c/foreignObject%3e%3c/g%3e%3c/g%3e%3cg class='edgeLabel'%3e%3cg transform='translate(0%2c 0)' class='label'%3e%3cforeignObject height='0' width='0'%3e%3cdiv style='display: table-cell%3b white-space: nowrap%3b line-height: 1.5%3b max-width: 200px%3b text-align: center%3b' class='labelBkg' xmlns='http://www.w3.org/1999/xhtml'%3e%3cspan class='edgeLabel'%3e%3c/span%3e%3c/div%3e%3c/foreignObject%3e%3c/g%3e%3c/g%3e%3cg class='edgeLabel'%3e%3cg transform='translate(0%2c 0)' class='label'%3e%3cforeignObject height='0' width='0'%3e%3cdiv style='display: table-cell%3b white-space: nowrap%3b line-height: 1.5%3b max-width: 200px%3b text-align: center%3b' class='labelBkg' xmlns='http://www.w3.org/1999/xhtml'%3e%3cspan class='edgeLabel'%3e%3c/span%3e%3c/div%3e%3c/foreignObject%3e%3c/g%3e%3c/g%3e%3c/g%3e%3cg class='nodes'%3e%3cg transform='translate(105.453125%2c 72.5)' id='flowchart-C1-0' class='node default'%3e%3crect height='54' width='124.90625' y='-27' x='-62.453125' style='fill:white !important%3bstroke:%23d4d4d4 !important%3bstroke-width:1px !important' class='basic label-container'/%3e%3cg transform='translate(-32.453125%2c -12)' style='color:%23171717 !important' class='label'%3e%3crect/%3e%3cforeignObject height='24' width='64.90625'%3e%3cdiv xmlns='http://www.w3.org/1999/xhtml' style='color: rgb(23%2c 23%2c 23) !important%3b display: table-cell%3b white-space: nowrap%3b line-height: 1.5%3b max-width: 200px%3b text-align: center%3b'%3e%3cspan class='nodeLabel' style='color:%23171717 !important'%3e%3cp%3ecommit 1%3c/p%3e%3c/span%3e%3c/div%3e%3c/foreignObject%3e%3c/g%3e%3c/g%3e%3cg transform='translate(105.453125%2c 201.5)' id='flowchart-C2-1' class='node default'%3e%3crect height='54' width='124.90625' y='-27' x='-62.453125' style='fill:white !important%3bstroke:%23d4d4d4 !important%3bstroke-width:1px !important' class='basic label-container'/%3e%3cg transform='translate(-32.453125%2c -12)' style='color:%23171717 !important' class='label'%3e%3crect/%3e%3cforeignObject height='24' width='64.90625'%3e%3cdiv xmlns='http://www.w3.org/1999/xhtml' style='color: rgb(23%2c 23%2c 23) !important%3b display: table-cell%3b white-space: nowrap%3b line-height: 1.5%3b max-width: 200px%3b text-align: center%3b'%3e%3cspan class='nodeLabel' style='color:%23171717 !important'%3e%3cp%3ecommit 2%3c/p%3e%3c/span%3e%3c/div%3e%3c/foreignObject%3e%3c/g%3e%3c/g%3e%3cg transform='translate(105.453125%2c 330.5)' id='flowchart-C3-2' class='node default'%3e%3crect height='54' width='73.34375' y='-27' x='-36.671875' style='fill:white !important%3bstroke:%23d4d4d4 !important%3bstroke-width:1px !important' class='basic label-container'/%3e%3cg transform='translate(-6.671875%2c -12)' style='color:%23171717 !important' class='label'%3e%3crect/%3e%3cforeignObject height='24' width='13.34375'%3e%3cdiv xmlns='http://www.w3.org/1999/xhtml' style='color: rgb(23%2c 23%2c 23) !important%3b display: table-cell%3b white-space: nowrap%3b line-height: 1.5%3b max-width: 200px%3b text-align: center%3b'%3e%3cspan class='nodeLabel' style='color:%23171717 !important'%3e%3cp%3e...%3c/p%3e%3c/span%3e%3c/div%3e%3c/foreignObject%3e%3c/g%3e%3c/g%3e%3cg transform='translate(105.453125%2c 459.5)' id='flowchart-C6-3' class='node default'%3e%3crect height='54' width='124.90625' y='-27' x='-62.453125' style='fill:white !important%3bstroke:%23d4d4d4 !important%3bstroke-width:1px !important' class='basic label-container'/%3e%3cg transform='translate(-32.453125%2c -12)' style='color:%23171717 !important' class='label'%3e%3crect/%3e%3cforeignObject height='24' width='64.90625'%3e%3cdiv xmlns='http://www.w3.org/1999/xhtml' style='color: rgb(23%2c 23%2c 23) !important%3b display: table-cell%3b white-space: nowrap%3b line-height: 1.5%3b max-width: 200px%3b text-align: center%3b'%3e%3cspan class='nodeLabel' style='color:%23171717 !important'%3e%3cp%3ecommit 6%3c/p%3e%3c/span%3e%3c/div%3e%3c/foreignObject%3e%3c/g%3e%3c/g%3e%3c/g%3e%3c/g%3e%3cg transform='translate(342.40625%2c 266)' id='flowchart-Squash-4' class='node default'%3e%3cpolygon style='fill:%237D7D7D !important%3bstroke:%23171717 !important%3bstroke-width:1px !important' transform='translate(-89.5%2c31.5)' class='label-container' points='15.75%2c0 163.25%2c0 179%2c-31.5 163.25%2c-63 15.75%2c-63 0%2c-31.5'/%3e%3cg transform='translate(-66.25%2c -24)' style='color:white !important' class='label'%3e%3crect/%3e%3cforeignObject height='48' width='132.5'%3e%3cdiv xmlns='http://www.w3.org/1999/xhtml' style='color: rgb(255%2c 255%2c 255) !important%3b display: table-cell%3b white-space: nowrap%3b line-height: 1.5%3b max-width: 200px%3b text-align: center%3b'%3e%3cspan class='nodeLabel' style='color:white !important'%3e%3cp%3eGitHub Classroom%3cbr /%3esquashes commits%3c/p%3e%3c/span%3e%3c/div%3e%3c/foreignObject%3e%3c/g%3e%3c/g%3e%3c/g%3e%3c/g%3e%3c/g%3e%3c/svg%3e)

Once a student accepts the invite link, Github automatically creates a repository inside your organization for them. This repo (hw1-cpp-basics-XingxinHE) is a fork of the assignment repo (isdn3000e-hw1-cpp-basics-hw-starter), NOT the template repo (hw-starter). This is very important!
%3b%7d%23mermaid-0 .cluster rect%7bfill:white%3bstroke:hsl(0%2c 0%25%2c 90%25)%3bstroke-width:1px%3b%7d%23mermaid-0 .cluster text%7bfill:black%3b%7d%23mermaid-0 .cluster span%7bcolor:black%3b%7d%23mermaid-0 div.mermaidTooltip%7bposition:absolute%3btext-align:center%3bmax-width:200px%3bpadding:2px%3bfont-family:arial%2csans-serif%3bfont-size:12px%3bbackground:white%3bborder:1px solid hsl(0%2c 0%25%2c 90%25)%3bborder-radius:2px%3bpointer-events:none%3bz-index:100%3b%7d%23mermaid-0 .flowchartTitleText%7btext-anchor:middle%3bfont-size:18px%3bfill:%23171717%3b%7d%23mermaid-0 rect.text%7bfill:none%3bstroke-width:0%3b%7d%23mermaid-0 .icon-shape%2c%23mermaid-0 .image-shape%7bbackground-color:%23f5f5f5%3btext-align:center%3b%7d%23mermaid-0 .icon-shape p%2c%23mermaid-0 .image-shape p%7bbackground-color:%23f5f5f5%3bpadding:2px%3b%7d%23mermaid-0 .icon-shape rect%2c%23mermaid-0 .image-shape rect%7bopacity:0.5%3bbackground-color:%23f5f5f5%3bfill:%23f5f5f5%3b%7d%23mermaid-0 :root%7b--mermaid-font-family:arial%2csans-serif%3b%7d%3c/style%3e%3cg%3e%3cmarker orient='auto' markerHeight='8' markerWidth='8' markerUnits='userSpaceOnUse' refY='5' refX='5' viewBox='0 0 10 10' class='marker flowchart-v2' id='mermaid-0_flowchart-v2-pointEnd'%3e%3cpath style='stroke-width: 1%3b stroke-dasharray: 1%2c 0%3b' class='arrowMarkerPath' d='M 0 0 L 10 5 L 0 10 z'/%3e%3c/marker%3e%3cmarker orient='auto' markerHeight='8' markerWidth='8' markerUnits='userSpaceOnUse' refY='5' refX='4.5' viewBox='0 0 10 10' class='marker flowchart-v2' id='mermaid-0_flowchart-v2-pointStart'%3e%3cpath style='stroke-width: 1%3b stroke-dasharray: 1%2c 0%3b' class='arrowMarkerPath' d='M 0 5 L 10 10 L 10 0 z'/%3e%3c/marker%3e%3cmarker orient='auto' markerHeight='11' markerWidth='11' markerUnits='userSpaceOnUse' refY='5' refX='11' viewBox='0 0 10 10' class='marker flowchart-v2' id='mermaid-0_flowchart-v2-circleEnd'%3e%3ccircle style='stroke-width: 1%3b stroke-dasharray: 1%2c 0%3b' class='arrowMarkerPath' r='5' cy='5' cx='5'/%3e%3c/marker%3e%3cmarker orient='auto' markerHeight='11' markerWidth='11' markerUnits='userSpaceOnUse' refY='5' refX='-1' viewBox='0 0 10 10' class='marker flowchart-v2' id='mermaid-0_flowchart-v2-circleStart'%3e%3ccircle style='stroke-width: 1%3b stroke-dasharray: 1%2c 0%3b' class='arrowMarkerPath' r='5' cy='5' cx='5'/%3e%3c/marker%3e%3cmarker orient='auto' markerHeight='11' markerWidth='11' markerUnits='userSpaceOnUse' refY='5.2' refX='12' viewBox='0 0 11 11' class='marker cross flowchart-v2' id='mermaid-0_flowchart-v2-crossEnd'%3e%3cpath style='stroke-width: 2%3b stroke-dasharray: 1%2c 0%3b' class='arrowMarkerPath' d='M 1%2c1 l 9%2c9 M 10%2c1 l -9%2c9'/%3e%3c/marker%3e%3cmarker orient='auto' markerHeight='11' markerWidth='11' markerUnits='userSpaceOnUse' refY='5.2' refX='-1' viewBox='0 0 11 11' class='marker cross flowchart-v2' id='mermaid-0_flowchart-v2-crossStart'%3e%3cpath style='stroke-width: 2%3b stroke-dasharray: 1%2c 0%3b' class='arrowMarkerPath' d='M 1%2c1 l 9%2c9 M 10%2c1 l -9%2c9'/%3e%3c/marker%3e%3cg class='root'%3e%3cg class='clusters'/%3e%3cg class='edgePaths'%3e%3cpath marker-end='url(%23mermaid-0_flowchart-v2-pointEnd)' style='' class='edge-thickness-normal edge-pattern-solid edge-thickness-normal edge-pattern-solid flowchart-link' id='L_A_B_0' d='M216.383%2c86L216.383%2c90.167C216.383%2c94.333%2c216.383%2c102.667%2c216.453%2c110.417C216.523%2c118.167%2c216.664%2c125.334%2c216.734%2c128.917L216.804%2c132.501'/%3e%3cpath marker-end='url(%23mermaid-0_flowchart-v2-pointEnd)' style='' class='edge-thickness-normal edge-pattern-solid edge-thickness-normal edge-pattern-solid flowchart-link' id='L_B_C_1' d='M177.826%2c241.272L162.676%2c253.864C147.525%2c266.457%2c117.223%2c291.643%2c102.073%2c311.735C86.922%2c331.828%2c86.922%2c346.828%2c86.922%2c354.328L86.922%2c361.828'/%3e%3cpath marker-end='url(%23mermaid-0_flowchart-v2-pointEnd)' style='' class='edge-thickness-normal edge-pattern-solid edge-thickness-normal edge-pattern-solid flowchart-link' id='L_B_D_2' d='M255.939%2c241.272L270.923%2c253.864C285.907%2c266.457%2c315.876%2c291.643%2c330.86%2c309.735C345.844%2c327.828%2c345.844%2c338.828%2c345.844%2c344.328L345.844%2c349.828'/%3e%3cpath marker-end='url(%23mermaid-0_flowchart-v2-pointEnd)' style='' class='edge-thickness-normal edge-pattern-solid edge-thickness-normal edge-pattern-solid flowchart-link' id='L_C_E_3' d='M86.922%2c443.828L86.922%2c453.995C86.922%2c464.161%2c86.922%2c484.495%2c86.922%2c502.161C86.922%2c519.828%2c86.922%2c534.828%2c86.922%2c542.328L86.922%2c549.828'/%3e%3cpath marker-end='url(%23mermaid-0_flowchart-v2-pointEnd)' style='' class='edge-thickness-normal edge-pattern-solid edge-thickness-normal edge-pattern-solid flowchart-link' id='L_D_F_4' d='M345.844%2c455.828L345.844%2c463.995C345.844%2c472.161%2c345.844%2c488.495%2c345.844%2c504.161C345.844%2c519.828%2c345.844%2c534.828%2c345.844%2c542.328L345.844%2c549.828'/%3e%3c/g%3e%3cg class='edgeLabels'%3e%3cg class='edgeLabel'%3e%3cg transform='translate(0%2c 0)' class='label'%3e%3cforeignObject height='0' width='0'%3e%3cdiv style='display: table-cell%3b white-space: nowrap%3b line-height: 1.5%3b max-width: 200px%3b text-align: center%3b' class='labelBkg' xmlns='http://www.w3.org/1999/xhtml'%3e%3cspan class='edgeLabel'%3e%3c/span%3e%3c/div%3e%3c/foreignObject%3e%3c/g%3e%3c/g%3e%3cg transform='translate(86.921875%2c 316.828125)' class='edgeLabel'%3e%3cg transform='translate(-43.7734375%2c -12)' class='label'%3e%3cforeignObject height='24' width='87.546875'%3e%3cdiv style='display: table-cell%3b white-space: nowrap%3b line-height: 1.5%3b max-width: 200px%3b text-align: center%3b' class='labelBkg' xmlns='http://www.w3.org/1999/xhtml'%3e%3cspan class='edgeLabel'%3e%3cp%3e%e2%9d%8c WRONG%3c/p%3e%3c/span%3e%3c/div%3e%3c/foreignObject%3e%3c/g%3e%3c/g%3e%3cg transform='translate(345.84375%2c 316.828125)' class='edgeLabel'%3e%3cg transform='translate(-51.78125%2c -12)' class='label'%3e%3cforeignObject height='24' width='103.5625'%3e%3cdiv style='display: table-cell%3b white-space: nowrap%3b line-height: 1.5%3b max-width: 200px%3b text-align: center%3b' class='labelBkg' xmlns='http://www.w3.org/1999/xhtml'%3e%3cspan class='edgeLabel'%3e%3cp%3e%e2%9c%85 CORRECT%3c/p%3e%3c/span%3e%3c/div%3e%3c/foreignObject%3e%3c/g%3e%3c/g%3e%3cg transform='translate(86.921875%2c 504.828125)' class='edgeLabel'%3e%3cg transform='translate(-66.015625%2c -24)' class='label'%3e%3cforeignObject height='48' width='132.03125'%3e%3cdiv style='display: table-cell%3b white-space: nowrap%3b line-height: 1.5%3b max-width: 200px%3b text-align: center%3b' class='labelBkg' xmlns='http://www.w3.org/1999/xhtml'%3e%3cspan class='edgeLabel'%3e%3cp%3estudents won't see%3cbr /%3echanges%3c/p%3e%3c/span%3e%3c/div%3e%3c/foreignObject%3e%3c/g%3e%3c/g%3e%3cg transform='translate(345.84375%2c 504.828125)' class='edgeLabel'%3e%3cg transform='translate(-43.5859375%2c -24)' class='label'%3e%3cforeignObject height='48' width='87.171875'%3e%3cdiv style='display: table-cell%3b white-space: nowrap%3b line-height: 1.5%3b max-width: 200px%3b text-align: center%3b' class='labelBkg' xmlns='http://www.w3.org/1999/xhtml'%3e%3cspan class='edgeLabel'%3e%3cp%3estudents get%3cbr /%3eupdates%3c/p%3e%3c/span%3e%3c/div%3e%3c/foreignObject%3e%3c/g%3e%3c/g%3e%3c/g%3e%3cg class='nodes'%3e%3cg transform='translate(216.3828125%2c 47)' id='flowchart-A-0' class='node default'%3e%3crect height='78' width='189.859375' y='-39' x='-94.9296875' style='fill:%23fafafa !important%3bstroke:%23171717 !important%3bstroke-width:1px !important' class='basic label-container'/%3e%3cg transform='translate(-64.9296875%2c -24)' style='color:%23171717 !important' class='label'%3e%3crect/%3e%3cforeignObject height='48' width='129.859375'%3e%3cdiv xmlns='http://www.w3.org/1999/xhtml' style='color: rgb(23%2c 23%2c 23) !important%3b display: table-cell%3b white-space: nowrap%3b line-height: 1.5%3b max-width: 200px%3b text-align: center%3b'%3e%3cspan class='nodeLabel' style='color:%23171717 !important'%3e%3cp%3eNeed to fix%3cbr /%3eassignment code%3f%3c/p%3e%3c/span%3e%3c/div%3e%3c/foreignObject%3e%3c/g%3e%3c/g%3e%3cg transform='translate(216.3828125%2c 207.9140625)' id='flowchart-B-1' class='node default'%3e%3cpolygon style='fill:white !important%3bstroke:%23171717 !important%3bstroke-width:1px !important' transform='translate(-71.9140625%2c71.9140625)' class='label-container' points='71.9140625%2c0 143.828125%2c-71.9140625 71.9140625%2c-143.828125 0%2c-71.9140625'/%3e%3cg transform='translate(-44.9140625%2c -12)' style='color:%23171717 !important' class='label'%3e%3crect/%3e%3cforeignObject height='24' width='89.828125'%3e%3cdiv xmlns='http://www.w3.org/1999/xhtml' style='color: rgb(23%2c 23%2c 23) !important%3b display: table-cell%3b white-space: nowrap%3b line-height: 1.5%3b max-width: 200px%3b text-align: center%3b'%3e%3cspan class='nodeLabel' style='color:%23171717 !important'%3e%3cp%3eWhich repo%3f%3c/p%3e%3c/span%3e%3c/div%3e%3c/foreignObject%3e%3c/g%3e%3c/g%3e%3cg transform='translate(86.921875%2c 404.828125)' id='flowchart-C-3' class='node default'%3e%3crect height='78' width='157.84375' y='-39' x='-78.921875' style='fill:%23fafafa !important%3bstroke:%23737373 !important%3bstroke-width:1px !important' class='basic label-container'/%3e%3cg transform='translate(-48.921875%2c -24)' style='color:%23737373 !important' class='label'%3e%3crect/%3e%3cforeignObject height='48' width='97.84375'%3e%3cdiv xmlns='http://www.w3.org/1999/xhtml' style='color: rgb(115%2c 115%2c 115) !important%3b display: table-cell%3b white-space: nowrap%3b line-height: 1.5%3b max-width: 200px%3b text-align: center%3b'%3e%3cspan class='nodeLabel' style='color:%23737373 !important'%3e%3cp%3ehw-starter%3cbr /%3e%3ci%3etemplate repo%3c/i%3e%3c/p%3e%3c/span%3e%3c/div%3e%3c/foreignObject%3e%3c/g%3e%3c/g%3e%3cg transform='translate(345.84375%2c 404.828125)' id='flowchart-D-5' class='node default'%3e%3crect height='102' width='260' y='-51' x='-130' style='fill:%23fafafa !important%3bstroke:%23171717 !important%3bstroke-width:2px !important' class='basic label-container'/%3e%3cg transform='translate(-100%2c -36)' style='color:%23171717 !important' class='label'%3e%3crect/%3e%3cforeignObject height='72' width='200'%3e%3cdiv xmlns='http://www.w3.org/1999/xhtml' style='color: rgb(23%2c 23%2c 23) !important%3b display: table%3b white-space: break-spaces%3b line-height: 1.5%3b max-width: 200px%3b text-align: center%3b width: 200px%3b'%3e%3cspan class='nodeLabel' style='color:%23171717 !important'%3e%3cp%3eisdn3000e-hw1-cpp-basics-hw-starter%3cbr /%3e%3ci%3eassignment repo%3c/i%3e%3c/p%3e%3c/span%3e%3c/div%3e%3c/foreignObject%3e%3c/g%3e%3c/g%3e%3cg transform='translate(86.921875%2c 592.828125)' id='flowchart-E-7' class='node default'%3e%3crect height='78' width='156.953125' y='-39' x='-78.4765625' style='fill:%23fafafa !important%3bstroke:%23737373 !important%3bstroke-width:1px !important' class='basic label-container'/%3e%3cg transform='translate(-48.4765625%2c -24)' style='color:%23737373 !important' class='label'%3e%3crect/%3e%3cforeignObject height='48' width='96.953125'%3e%3cdiv xmlns='http://www.w3.org/1999/xhtml' style='color: rgb(115%2c 115%2c 115) !important%3b display: table-cell%3b white-space: nowrap%3b line-height: 1.5%3b max-width: 200px%3b text-align: center%3b'%3e%3cspan class='nodeLabel' style='color:%23737373 !important'%3e%3cp%3estudent repos%3cbr /%3eunchanged%3c/p%3e%3c/span%3e%3c/div%3e%3c/foreignObject%3e%3c/g%3e%3c/g%3e%3cg transform='translate(345.84375%2c 592.828125)' id='flowchart-F-9' class='node default'%3e%3crect height='78' width='156.953125' y='-39' x='-78.4765625' style='fill:%23fafafa !important%3bstroke:%23171717 !important%3bstroke-width:2px !important' class='basic label-container'/%3e%3cg transform='translate(-48.4765625%2c -24)' style='color:%23171717 !important' class='label'%3e%3crect/%3e%3cforeignObject height='48' width='96.953125'%3e%3cdiv xmlns='http://www.w3.org/1999/xhtml' style='color: rgb(23%2c 23%2c 23) !important%3b display: table-cell%3b white-space: nowrap%3b line-height: 1.5%3b max-width: 200px%3b text-align: center%3b'%3e%3cspan class='nodeLabel' style='color:%23171717 !important'%3e%3cp%3estudent repos%3cbr /%3eupdated%3c/p%3e%3c/span%3e%3c/div%3e%3c/foreignObject%3e%3c/g%3e%3c/g%3e%3c/g%3e%3c/g%3e%3c/g%3e%3c/svg%3e)
If you need to fix a bug in the the assignment code, which repo should you modify?
- ❌
hw-starter- ✅
isdn3000e-hw1-cpp-basics-hw-starterIt is confusing at first, but once you understand the relationship, it makes perfect sense.
Can students see other repos in your org?
The short answer is no. After the student accepts the assignment, their repository (hw1-cpp-basics-XingxinHE) is created inside your organization. The student receives an email inviting them to be an outside collaborator for their repository only. They cannot see the template repo, the assignment repo, or any other students’ repositories.
%3b%7d%23mermaid-0 .cluster rect%7bfill:white%3bstroke:hsl(0%2c 0%25%2c 90%25)%3bstroke-width:1px%3b%7d%23mermaid-0 .cluster text%7bfill:black%3b%7d%23mermaid-0 .cluster span%7bcolor:black%3b%7d%23mermaid-0 div.mermaidTooltip%7bposition:absolute%3btext-align:center%3bmax-width:200px%3bpadding:2px%3bfont-family:arial%2csans-serif%3bfont-size:12px%3bbackground:white%3bborder:1px solid hsl(0%2c 0%25%2c 90%25)%3bborder-radius:2px%3bpointer-events:none%3bz-index:100%3b%7d%23mermaid-0 .flowchartTitleText%7btext-anchor:middle%3bfont-size:18px%3bfill:%23171717%3b%7d%23mermaid-0 rect.text%7bfill:none%3bstroke-width:0%3b%7d%23mermaid-0 .icon-shape%2c%23mermaid-0 .image-shape%7bbackground-color:%23f5f5f5%3btext-align:center%3b%7d%23mermaid-0 .icon-shape p%2c%23mermaid-0 .image-shape p%7bbackground-color:%23f5f5f5%3bpadding:2px%3b%7d%23mermaid-0 .icon-shape rect%2c%23mermaid-0 .image-shape rect%7bopacity:0.5%3bbackground-color:%23f5f5f5%3bfill:%23f5f5f5%3b%7d%23mermaid-0 :root%7b--mermaid-font-family:arial%2csans-serif%3b%7d%3c/style%3e%3cg%3e%3cmarker orient='auto' markerHeight='8' markerWidth='8' markerUnits='userSpaceOnUse' refY='5' refX='5' viewBox='0 0 10 10' class='marker flowchart-v2' id='mermaid-0_flowchart-v2-pointEnd'%3e%3cpath style='stroke-width: 1%3b stroke-dasharray: 1%2c 0%3b' class='arrowMarkerPath' d='M 0 0 L 10 5 L 0 10 z'/%3e%3c/marker%3e%3cmarker orient='auto' markerHeight='8' markerWidth='8' markerUnits='userSpaceOnUse' refY='5' refX='4.5' viewBox='0 0 10 10' class='marker flowchart-v2' id='mermaid-0_flowchart-v2-pointStart'%3e%3cpath style='stroke-width: 1%3b stroke-dasharray: 1%2c 0%3b' class='arrowMarkerPath' d='M 0 5 L 10 10 L 10 0 z'/%3e%3c/marker%3e%3cmarker orient='auto' markerHeight='11' markerWidth='11' markerUnits='userSpaceOnUse' refY='5' refX='11' viewBox='0 0 10 10' class='marker flowchart-v2' id='mermaid-0_flowchart-v2-circleEnd'%3e%3ccircle style='stroke-width: 1%3b stroke-dasharray: 1%2c 0%3b' class='arrowMarkerPath' r='5' cy='5' cx='5'/%3e%3c/marker%3e%3cmarker orient='auto' markerHeight='11' markerWidth='11' markerUnits='userSpaceOnUse' refY='5' refX='-1' viewBox='0 0 10 10' class='marker flowchart-v2' id='mermaid-0_flowchart-v2-circleStart'%3e%3ccircle style='stroke-width: 1%3b stroke-dasharray: 1%2c 0%3b' class='arrowMarkerPath' r='5' cy='5' cx='5'/%3e%3c/marker%3e%3cmarker orient='auto' markerHeight='11' markerWidth='11' markerUnits='userSpaceOnUse' refY='5.2' refX='12' viewBox='0 0 11 11' class='marker cross flowchart-v2' id='mermaid-0_flowchart-v2-crossEnd'%3e%3cpath style='stroke-width: 2%3b stroke-dasharray: 1%2c 0%3b' class='arrowMarkerPath' d='M 1%2c1 l 9%2c9 M 10%2c1 l -9%2c9'/%3e%3c/marker%3e%3cmarker orient='auto' markerHeight='11' markerWidth='11' markerUnits='userSpaceOnUse' refY='5.2' refX='-1' viewBox='0 0 11 11' class='marker cross flowchart-v2' id='mermaid-0_flowchart-v2-crossStart'%3e%3cpath style='stroke-width: 2%3b stroke-dasharray: 1%2c 0%3b' class='arrowMarkerPath' d='M 1%2c1 l 9%2c9 M 10%2c1 l -9%2c9'/%3e%3c/marker%3e%3cg class='root'%3e%3cg class='clusters'%3e%3cg data-look='classic' id='Org' class='cluster'%3e%3crect height='202' width='1229.03125' y='145' x='8' style='fill:%23fafafa !important%3bstroke:%23171717 !important%3bstroke-width:1px !important'/%3e%3cg transform='translate(531.6484375%2c 145)' class='cluster-label'%3e%3cforeignObject height='24' width='181.734375'%3e%3cdiv style='display: table-cell%3b white-space: nowrap%3b line-height: 1.5%3b max-width: 200px%3b text-align: center%3b' xmlns='http://www.w3.org/1999/xhtml'%3e%3cspan style='color:%23171717 !important' class='nodeLabel'%3e%3cp%3eYour GitHub Organization%3c/p%3e%3c/span%3e%3c/div%3e%3c/foreignObject%3e%3c/g%3e%3c/g%3e%3cg data-look='classic' id='NotVisibleToStudent' class='cluster'%3e%3crect height='152' width='847.84375' y='170' x='28' style='fill:white !important%3bstroke:%23737373 !important%3bstroke-width:1px !important'/%3e%3cg transform='translate(362.90625%2c 170)' class='cluster-label'%3e%3cforeignObject height='24' width='178.03125'%3e%3cdiv style='display: table-cell%3b white-space: nowrap%3b line-height: 1.5%3b max-width: 200px%3b text-align: center%3b' xmlns='http://www.w3.org/1999/xhtml'%3e%3cspan style='color:%23737373 !important' class='nodeLabel'%3e%3cp%3e%e2%9d%8c Not Visible to Student%3c/p%3e%3c/span%3e%3c/div%3e%3c/foreignObject%3e%3c/g%3e%3c/g%3e%3cg data-look='classic' id='VisibleToStudent' class='cluster'%3e%3crect height='152' width='321.1875' y='170' x='895.84375' style='fill:white !important%3bstroke:%23171717 !important%3bstroke-width:1px !important'/%3e%3cg transform='translate(982.09375%2c 170)' class='cluster-label'%3e%3cforeignObject height='24' width='148.6875'%3e%3cdiv style='display: table-cell%3b white-space: nowrap%3b line-height: 1.5%3b max-width: 200px%3b text-align: center%3b' xmlns='http://www.w3.org/1999/xhtml'%3e%3cspan style='color:%23171717 !important' class='nodeLabel'%3e%3cp%3e%e2%9c%85 Visible to Student%3c/p%3e%3c/span%3e%3c/div%3e%3c/foreignObject%3e%3c/g%3e%3c/g%3e%3c/g%3e%3cg class='edgePaths'%3e%3cpath marker-end='url(%23mermaid-0_flowchart-v2-pointEnd)' style='' class='edge-thickness-normal edge-pattern-dotted edge-thickness-normal edge-pattern-solid flowchart-link' id='L_Student_StudentRepo_0' d='M666.578%2c51.785L731.555%2c61.154C796.531%2c70.523%2c926.484%2c89.262%2c991.461%2c104.797C1056.438%2c120.333%2c1056.438%2c132.667%2c1056.438%2c143C1056.438%2c153.333%2c1056.438%2c161.667%2c1056.438%2c171.333C1056.438%2c181%2c1056.438%2c192%2c1056.438%2c197.5L1056.438%2c203'/%3e%3cpath marker-end='url(%23mermaid-0_flowchart-v2-pointEnd)' style='' class='edge-thickness-normal edge-pattern-dotted edge-thickness-normal edge-pattern-solid flowchart-link' id='L_Student_OtherStudentRepo_1' d='M496.188%2c54.526L445.656%2c63.438C395.125%2c72.351%2c294.063%2c90.175%2c243.531%2c105.254C193%2c120.333%2c193%2c132.667%2c193%2c143C193%2c153.333%2c193%2c161.667%2c193%2c169.333C193%2c177%2c193%2c184%2c193%2c187.5L193%2c191'/%3e%3cpath marker-end='url(%23mermaid-0_flowchart-v2-pointEnd)' style='' class='edge-thickness-normal edge-pattern-dotted edge-thickness-normal edge-pattern-solid flowchart-link' id='L_Student_TemplateRepo_2' d='M521.85%2c71L510.195%2c77.167C498.54%2c83.333%2c475.231%2c95.667%2c463.577%2c108C451.922%2c120.333%2c451.922%2c132.667%2c451.922%2c143C451.922%2c153.333%2c451.922%2c161.667%2c451.922%2c171.333C451.922%2c181%2c451.922%2c192%2c451.922%2c197.5L451.922%2c203'/%3e%3cpath marker-end='url(%23mermaid-0_flowchart-v2-pointEnd)' style='' class='edge-thickness-normal edge-pattern-dotted edge-thickness-normal edge-pattern-solid flowchart-link' id='L_Student_AssignmentRepo_3' d='M640.916%2c71L652.571%2c77.167C664.225%2c83.333%2c687.534%2c95.667%2c699.189%2c108C710.844%2c120.333%2c710.844%2c132.667%2c710.844%2c143C710.844%2c153.333%2c710.844%2c161.667%2c710.844%2c169.333C710.844%2c177%2c710.844%2c184%2c710.844%2c187.5L710.844%2c191'/%3e%3c/g%3e%3cg class='edgeLabels'%3e%3cg transform='translate(1056.4375%2c 108)' class='edgeLabel'%3e%3cg transform='translate(-40.0234375%2c -12)' class='label'%3e%3cforeignObject height='24' width='80.046875'%3e%3cdiv style='display: table-cell%3b white-space: nowrap%3b line-height: 1.5%3b max-width: 200px%3b text-align: center%3b' class='labelBkg' xmlns='http://www.w3.org/1999/xhtml'%3e%3cspan class='edgeLabel'%3e%3cp%3ecan access%3c/p%3e%3c/span%3e%3c/div%3e%3c/foreignObject%3e%3c/g%3e%3c/g%3e%3cg transform='translate(193%2c 108)' class='edgeLabel'%3e%3cg transform='translate(-51.140625%2c -12)' class='label'%3e%3cforeignObject height='24' width='102.28125'%3e%3cdiv style='display: table-cell%3b white-space: nowrap%3b line-height: 1.5%3b max-width: 200px%3b text-align: center%3b' class='labelBkg' xmlns='http://www.w3.org/1999/xhtml'%3e%3cspan class='edgeLabel'%3e%3cp%3ecannot access%3c/p%3e%3c/span%3e%3c/div%3e%3c/foreignObject%3e%3c/g%3e%3c/g%3e%3cg transform='translate(451.921875%2c 108)' class='edgeLabel'%3e%3cg transform='translate(-51.140625%2c -12)' class='label'%3e%3cforeignObject height='24' width='102.28125'%3e%3cdiv style='display: table-cell%3b white-space: nowrap%3b line-height: 1.5%3b max-width: 200px%3b text-align: center%3b' class='labelBkg' xmlns='http://www.w3.org/1999/xhtml'%3e%3cspan class='edgeLabel'%3e%3cp%3ecannot access%3c/p%3e%3c/span%3e%3c/div%3e%3c/foreignObject%3e%3c/g%3e%3c/g%3e%3cg transform='translate(710.84375%2c 108)' class='edgeLabel'%3e%3cg transform='translate(-51.140625%2c -12)' class='label'%3e%3cforeignObject height='24' width='102.28125'%3e%3cdiv style='display: table-cell%3b white-space: nowrap%3b line-height: 1.5%3b max-width: 200px%3b text-align: center%3b' class='labelBkg' xmlns='http://www.w3.org/1999/xhtml'%3e%3cspan class='edgeLabel'%3e%3cp%3ecannot access%3c/p%3e%3c/span%3e%3c/div%3e%3c/foreignObject%3e%3c/g%3e%3c/g%3e%3c/g%3e%3cg class='nodes'%3e%3cg transform='translate(1056.4375%2c 246)' id='flowchart-StudentRepo-0' class='node default'%3e%3crect height='78' width='251.1875' y='-39' x='-125.59375' style='fill:white !important%3bstroke:%23171717 !important%3bstroke-width:2px !important' class='basic label-container'/%3e%3cg transform='translate(-95.59375%2c -24)' style='color:%23171717 !important' class='label'%3e%3crect/%3e%3cforeignObject height='48' width='191.1875'%3e%3cdiv xmlns='http://www.w3.org/1999/xhtml' style='color: rgb(23%2c 23%2c 23) !important%3b display: table-cell%3b white-space: nowrap%3b line-height: 1.5%3b max-width: 200px%3b text-align: center%3b'%3e%3cspan class='nodeLabel' style='color:%23171717 !important'%3e%3cp%3ehw1-cpp-basics-XingxinHE%3cbr /%3e%3ci%3estudent's own repo%3c/i%3e%3c/p%3e%3c/span%3e%3c/div%3e%3c/foreignObject%3e%3c/g%3e%3c/g%3e%3cg transform='translate(193%2c 246)' id='flowchart-OtherStudentRepo-1' class='node default'%3e%3crect height='102' width='260' y='-51' x='-130' style='fill:%23fafafa !important%3bstroke:%23d4d4d4 !important%3bstroke-width:1px !important' class='basic label-container'/%3e%3cg transform='translate(-100%2c -36)' style='color:%23737373 !important' class='label'%3e%3crect/%3e%3cforeignObject height='72' width='200'%3e%3cdiv xmlns='http://www.w3.org/1999/xhtml' style='color: rgb(115%2c 115%2c 115) !important%3b display: table%3b white-space: break-spaces%3b line-height: 1.5%3b max-width: 200px%3b text-align: center%3b width: 200px%3b'%3e%3cspan class='nodeLabel' style='color:%23737373 !important'%3e%3cp%3ehw1-cpp-basics-OtherStudent%3cbr /%3e%3ci%3eother students' repos%3c/i%3e%3c/p%3e%3c/span%3e%3c/div%3e%3c/foreignObject%3e%3c/g%3e%3c/g%3e%3cg transform='translate(451.921875%2c 246)' id='flowchart-TemplateRepo-2' class='node default'%3e%3crect height='78' width='157.84375' y='-39' x='-78.921875' style='fill:%23fafafa !important%3bstroke:%23d4d4d4 !important%3bstroke-width:1px !important' class='basic label-container'/%3e%3cg transform='translate(-48.921875%2c -24)' style='color:%23737373 !important' class='label'%3e%3crect/%3e%3cforeignObject height='48' width='97.84375'%3e%3cdiv xmlns='http://www.w3.org/1999/xhtml' style='color: rgb(115%2c 115%2c 115) !important%3b display: table-cell%3b white-space: nowrap%3b line-height: 1.5%3b max-width: 200px%3b text-align: center%3b'%3e%3cspan class='nodeLabel' style='color:%23737373 !important'%3e%3cp%3ehw-starter%3cbr /%3e%3ci%3etemplate repo%3c/i%3e%3c/p%3e%3c/span%3e%3c/div%3e%3c/foreignObject%3e%3c/g%3e%3c/g%3e%3cg transform='translate(710.84375%2c 246)' id='flowchart-AssignmentRepo-3' class='node default'%3e%3crect height='102' width='260' y='-51' x='-130' style='fill:%23fafafa !important%3bstroke:%23d4d4d4 !important%3bstroke-width:1px !important' class='basic label-container'/%3e%3cg transform='translate(-100%2c -36)' style='color:%23737373 !important' class='label'%3e%3crect/%3e%3cforeignObject height='72' width='200'%3e%3cdiv xmlns='http://www.w3.org/1999/xhtml' style='color: rgb(115%2c 115%2c 115) !important%3b display: table%3b white-space: break-spaces%3b line-height: 1.5%3b max-width: 200px%3b text-align: center%3b width: 200px%3b'%3e%3cspan class='nodeLabel' style='color:%23737373 !important'%3e%3cp%3eisdn3000e-hw1-cpp-basics-hw-starter%3cbr /%3e%3ci%3eassignment repo%3c/i%3e%3c/p%3e%3c/span%3e%3c/div%3e%3c/foreignObject%3e%3c/g%3e%3c/g%3e%3cg transform='translate(581.3828125%2c 39.5)' id='flowchart-Student-4' class='node default'%3e%3crect height='63' width='170.390625' y='-31.5' x='-85.1953125' ry='31.5' rx='31.5' style='fill:%23A8A8A8 !important%3bstroke:%23171717 !important%3bstroke-width:1px !important' class='basic label-container'/%3e%3cg transform='translate(-69.8203125%2c -24)' style='color:white !important' class='label'%3e%3crect/%3e%3cforeignObject height='48' width='139.640625'%3e%3cdiv xmlns='http://www.w3.org/1999/xhtml' style='color: rgb(255%2c 255%2c 255) !important%3b display: table-cell%3b white-space: nowrap%3b line-height: 1.5%3b max-width: 200px%3b text-align: center%3b'%3e%3cspan class='nodeLabel' style='color:white !important'%3e%3cp%3eStudent%3cbr /%3eoutside collaborator%3c/p%3e%3c/span%3e%3c/div%3e%3c/foreignObject%3e%3c/g%3e%3c/g%3e%3c/g%3e%3c/g%3e%3c/g%3e%3c/svg%3e)
Autograding system
At first, the autograding options in the UI can be confusing. What do these tabs mean?
The simple answer is that the “GitHub Preset” in the UI is just a helper tool that generates a .yaml file for GitHub Actions. Since that’s all it does, it’s much better to just learn the syntax of the autograding .yaml file yourself.
The autograding system relies on three specific Github Actions:
These corresponds to the three grading methods provided by Github Classroom. I’ll use the autograding-command-grader as an example.
name: Autograding Tests
'on':
- push
- repository_dispatch
permissions:
checks: write
actions: read
contents: read
jobs:
run-autograding-tests:
runs-on: ubuntu-latest
if: github.actor != 'github-classroom[bot]'
steps:
- name: Checkout code
uses: actions/checkout@v4
- name: 'Task 1'
id: task-1
uses: classroom-resources/autograding-command-grader@v1
with:
test-name: 'Task 1'
setup-command: "./scripts/build_for_grade.sh"
command: "./scripts/grade_task1.sh"
timeout: 10
max-score: 40
- name: 'Task 2'
id: task-2
uses: classroom-resources/autograding-command-grader@v1
with:
test-name: 'Task 2'
setup-command: "./scripts/build_for_grade.sh"
command: "./scripts/grade_task2.sh"
timeout: 10
max-score: 60
- name: Autograding Reporter
uses: classroom-resources/autograding-grading-reporter@v1
env:
TASK-1_RESULTS: "${{steps.task-1.outputs.result}}"
TASK-2_RESULTS: "${{steps.task-2.outputs.result}}"
with:
runners: task-1,task-2- The
setup-commandacts as your build command (i.e., whatever needs to run before the test_. - The
commandis the actual grading command. Because this is acommand-grader, the exit code determine whether the test passes or fails. If the script returns0, the test passes and the student gets the points✅.
If this is a C++ assignment, your build_for_grade.sh might look like this:
#!/usr/bin/env bash
set -euo pipefail
cmake -B build
cmake --build buildAnd if you are using GoogleTest, your grade_task1.sh could look like this:
#!/usr/bin/env bash
set -euo pipefail
./build/test_assignment --gtest_color=yes --gtest_filter='*YourTestName/*'Phase 3: Syncing Canvas
For this section, there two links are very helpful:
This step will likely require some communication with your university’s Canvas IT support team.
Get the client ID
Write an email to the Canvas team. Here is an email template you can use:
Dear Canvas Support Team,

I am writing to request the Client ID required to integrate GitHub Classroom with the course, {your course name}.


We are using GitHub Classroom to manage coding assignments and would like to link it to Canvas to sync our student roster. According to the GitHub documentation, this integration requires a Client ID that was generated when HKUST registered its Canvas instance with GitHub.

https://docs.github.com/en/education/manage-coursework-with-github-classroom/teach-with-github-classroom/connect-a-learning-management-system-course-to-a-classroom#linking-a-canvas-course-with-a-classroom

I am wondering if it is possible to have the Client ID for the approved GitHub Classroom LTI tool?

Sincerely thanks,

{your name}
Teaching Assistant of {your course name}
Add the app to your course
Once you receive the Client ID, go to your course page in Canvas. Navigate to “Settings” > “Apps” > ”+ App”.
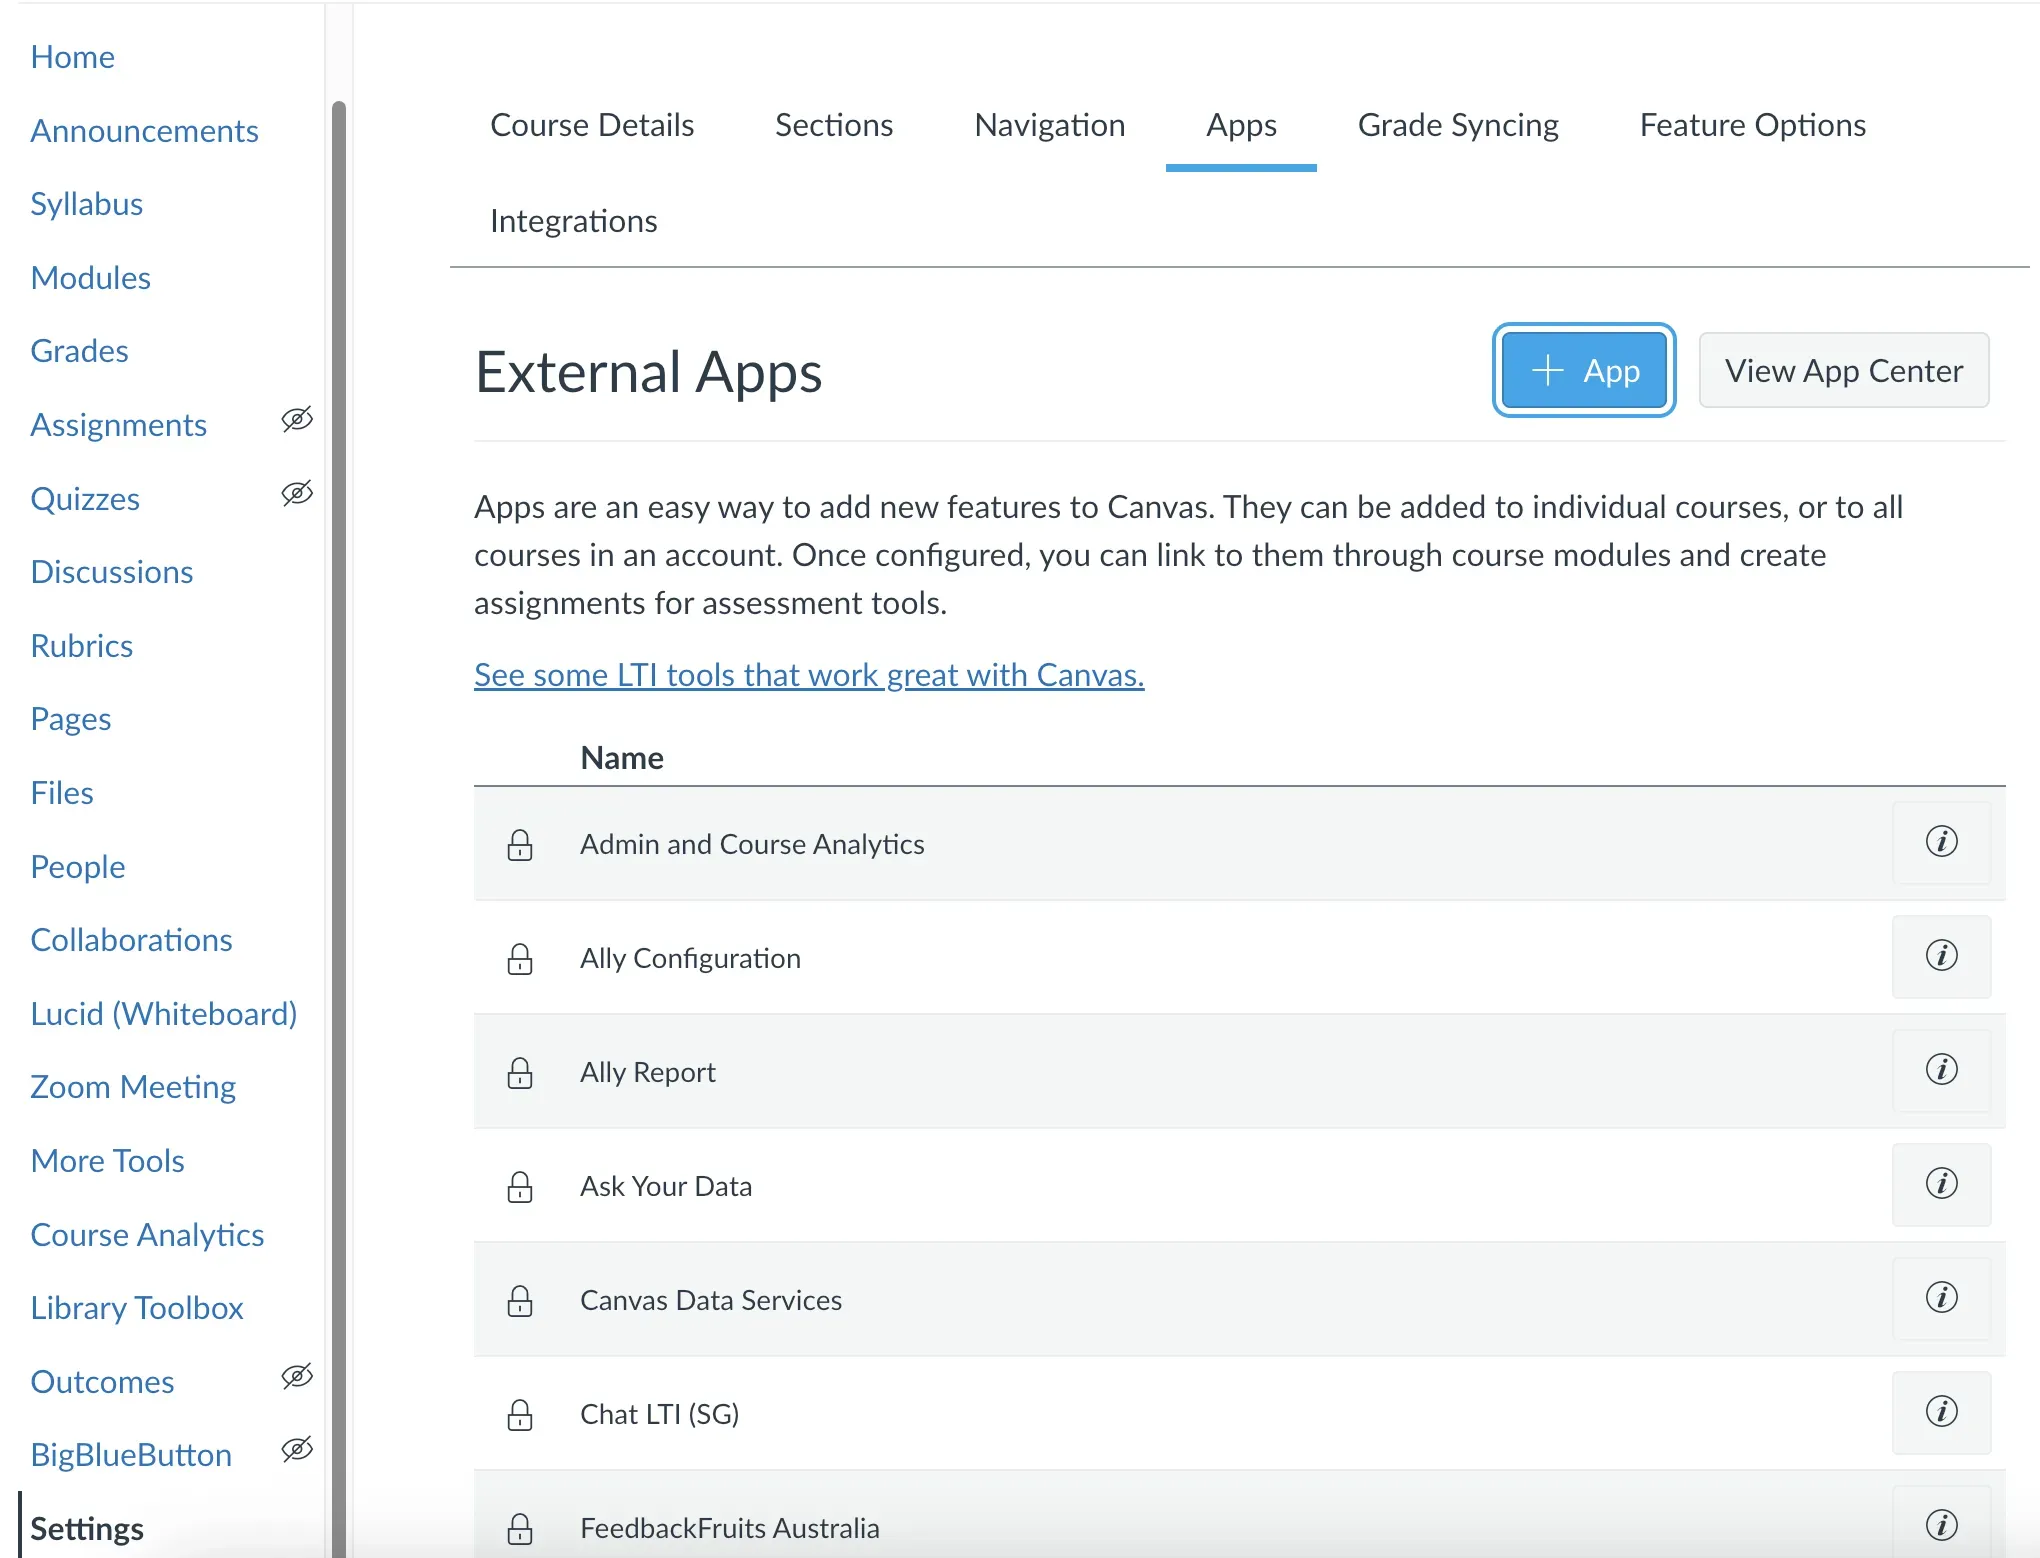
Fill the Client ID provided by your Canvas support team.

Register your learning management system
Navigate to register-lms . Fill in the following information:
- LMS Type: Canvas
- Issuer Identifier:
https://canvas.instructure.com - Domain:
https://canvas.{your university domain} - Client ID:
{your client id, e.g. 2694000xxxx} - OIDC Authorization end-point:
https://canvas.{your university domain}/api/lti/authorize_redirect - OAuth 2.0 Token Retrieval URL:
https://canvas.{your university domain}/login/oauth2/token - Key Set URL:
https://canvas.{your university domain}/api/lti/security/jwks
If the client id is valid and the access is configured correctly, your Canvas course homepage should now feature a GitHub Classroom button.

From there, you can click the link, sync your roster, and add your students!