In this article, I will guide you through the process of versioning a large dataset (e.g., 10GB+) in your Git repo without actually git add those large files. The tech stack we are using is Cloudflare R2 and DVC(Data Version Control). As of October 28th, 2025, the Cloudflare R2’s free tier is generous enough to store 10GB for free, making this a powerful alternative to Git LFS.
Remark
The Cloudflare R2 is an object storage service that is compatible with the Amazon S3 api. This is what allows DVC to work with it seamlessly.
TipThis article is no-brainer, step-by-step tutorial.
TL;DR
The idea is to commit a lightweight pointer file(hash) to Git. Your actual large data files are pushed to an S3-compatible bucket(Cloudflare R2).
Step 1: Register a Cloudflare Account and R2 Bucket
- Register: Navigate to this link to register a Cloudflare account if you haven’t.
- Create Bucket: Go to the R2 page on your Cloudflare dashboard. Click “Create bucket,” give it a unique name, and choose a location.
Remark
A bucket is like a drive in your PC(e.g.,
D:). You can create folders inside it to organize your data.
Step 2: Create an R2 API Toekn
Why do we need an API token?
You need to give DVC permission to read and write to your bucket.
Follow the orders:
- From the R2 Overview page, click “Manage R2 API Tokens” on the right sidebar. (there is a button like
{} Manage.) - Click “Create API Token”.
- Give the token a name (e.g., “dvc-worker”).
- For permissions, select “Read & Write” so DVC can push and pull data.
- You can apply this token to all buckets or a specific one. For this guide, selecting your new bucket is a good choice.
- Click “Create API Token” and immediately copy the
Access Key IDandSecret Access Key. You will not see the secret key again!

Step 3: Install DVC
Now, in your local project’s terminal, install Data Version Control. We include the [s3] extra, which gives DVC the libraries needed to talk to S3-compatible services.
# assume you have a Python environment with pip
pip install dvc[s3]Step 4: Configure DVC in Your Git Repo
This is where we connect your local project to the R2 bucket.
📌Initialize DVC
In the root of your Git repository, run:
dvc initThis creates a .dvc/ directory, which you git add it.
📌Find Your R2 Endpoint
Go to the R2 bucket overview page and click the bucket you just created.

Copy the “S3 API” endpoint URL.
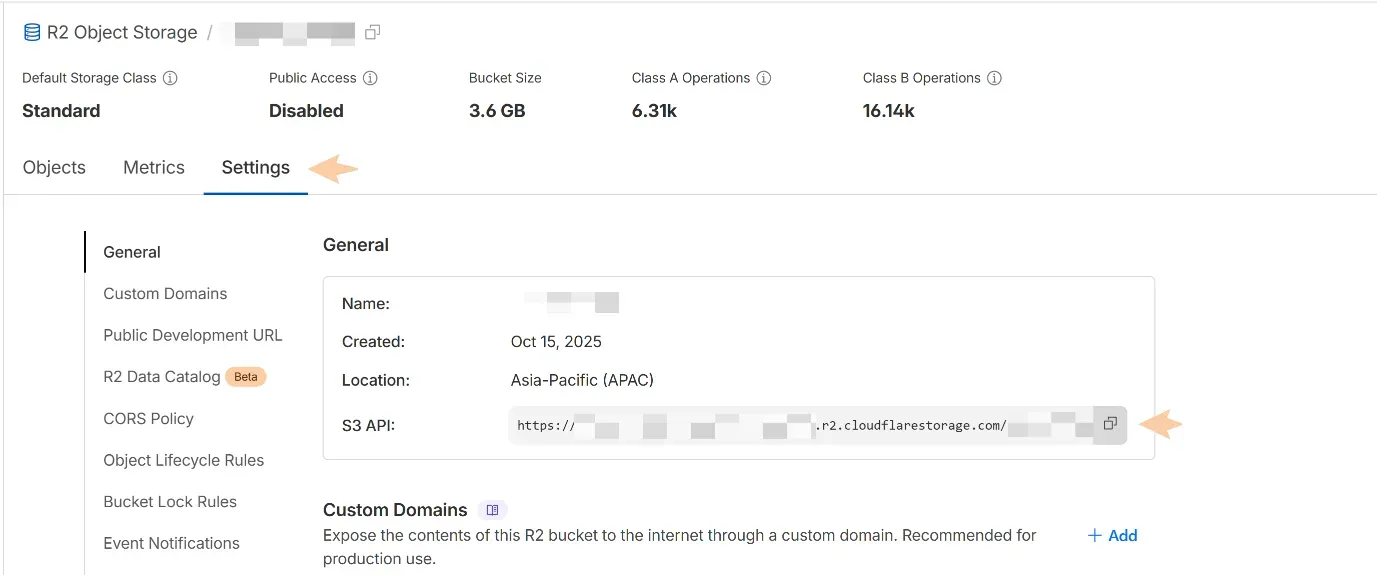
It will look like this: https://<ACCOUNT_ID>.r2.cloudflarestorage.com
📌Add the DVC Remote
Run these commands in your terminal, replacing the placeholders with your own values. Let’s call our remote my-r2-remote.
# Set the bucket as the remote
dvc remote add -d my-r2-remote s3://<your_bucket_name>
# Set the R2 endpoint URL
dvc remote modify my-r2-remote endpointurl https://<ACCOUNT_ID>.r2.cloudflarestorage.com📌Set Your Credentials Now, tell DVC the API keys you saved in Step 2. These are stored in your local DVC config, not checked into Git.
dvc remote modify --local my-r2-remote access_key_id 'YOUR_ACCESS_KEY_ID'
dvc remote modify --local my-r2-remote secret_access_key 'YOUR_SECRET_ACCESS_KEY'Remark
If you enabled MFA, you might need to add
session_token. See more at Amazon S3 | Data Version Control · DVC
Step 5: Track and Push Your Data
This is the main workflow.
📌Add Your Data to DVC
Tell DVC to track your large data file or folder. Suppose I have a dataset folder and it is 5GB.
dvc add dataset/DVC creates a small file named datasets.dvc and automatically adds your original folder to .gitignore.
Here’s a quick glance on the .dvc file:
outs:
- md5: ea9d95d6be012b1962ca54a6b2861270.dir
  size: 3487406232
  nfiles: 23
  hash: md5
  path: datasets
📌Commit the Pointer File to Git This is the key step. You are committing the small pointer file, not the large dataset.
git add dataset.dvc .gitignore
git commit -m "Add large dataset"📌Push Your Data to R2 Now, push the actual data to your cloud storage.
dvc pushStep 6: Verify Your Push
Congrats! Your data is now versioned. To test that it works, let’s mimic a fresh clone.
📌Simulate a fresh state
rm -rf .dvc/cache
rm -rf dataset/📌Pull the data from R2
dvc pullThere you go! DVC reads the pointer file and downloads the large dataset from your R2 bucket. Your repo is compact, your data is versioned, and it can be pulled by anyone with access.